Thursday, September 30, 2010

Sticky Buns made with Pumpkin Pie Brioche (20th Bread Braid)

Wow! This week I had an awesome fun time working with the Pumpkin Pie Brioche to create 3 delectable desserts. 

I'm so glad we had cooler weather this week and last.  It was so much more enjoyable in the kitchen.  I chose to make the Pumpkin Pie Brioche dough for these recipes for two reasons.  One, it looked tastier and, two, I'd never roasted a pie pumpkin before and was eager to do it for the first time. 

Here is my pie pumpkin ready to go into the oven to be roasted:  I scooped the seeds out before I roasted it.

 After I roasted the pumpkin, I peeled off the skin, roughly chopped it, put it into the food processor for a spin, and then into a cheesecloth lined colander to drain for a few hours:


I got almost exactly my 1 3/4 cups pumpkin puree from a 3.15 lb pumpkin.  We got a good bit of seeds from this little pumpkin and we found them quite tasty after roasting for an hour.  We tossed the seeds with melted butter, salt, Worcestershire Sauce, sugar, garlic powder & a pinch of cayenne.
The dough went together quite easily.  I did make a few modifications as I went along.  Usually, brioche recipes call for egg yolks and not the whites.  This time I used just the yolk for only 1 of my 4 required eggs, but in the future I might try tweaking/playing with the recipe further.  My other modifications were:
+ 1 Tbsp sugar
+ 2 tsp Madagascar Vanilla (-some of the honey)
+ 1.5 times the amount of spices
- 1/4 cup of water

I made the dough on Friday and on Saturday my husband and I dove into the Sticky Bun project.  I was really nervous as I had never made any kind of sticky bun before.  My hubby was just hungry and said "Let's get started!!!"

Dean doesn't like sticky buns that are really sticky, nor excessively sweet so we went to kingarthurflour.com/recipes/ridiculously-easy-no-knead-sticky-buns-recipe and used their recipe for the topping that went into our 9" cake pan.  We omitted the sticky bun sugar (as we didn't have any) and only sparingly sprinkled the pan with pecan pieces.  (Dean's not a fan of nuts in his desserts.)  For the filling we combined 2/3 cups sugar, 1 Tbsp cinnamon, and maybe a 1/2 tsp of orange zest.  We were going to sprinkle some raisins over the dough before we rolled it up, but we forgot.  Before we sprinkled our cinnamon/sugar mixture onto the dough we tried spreading some honey on the dough.  It was kind of tough to spread, but we got some on.  Here is our dough ready to be rolled:

Here is our before and after (rising for an hour) picture for our assembled pan of buns:
I was up and down the stairs all during the "rising" hour checking on the progress of the buns.  I was so excited that they were puffing up, expanding out until they touched, and then pressing up against one another.  Dean wasn't quite so excited as I was, just still hungry.
Tucker was just bored,
but loving the smells:
Finally, the anticipated moment when it's time to eat and share with neighbors these Pumpkin Pie Brioche sticky buns that were just amazing!!!  (I wish I could install a smell-a-vision feature here)
Make sure you visit Big Black Dogs to take a peek at what others have done with their Honey Caramel Sticky Nut Buns.

Monday, September 20, 2010

Maple Oatmeal & Quinoa Bread (19th Bread Braid)

This biweekly part of our bread journey took us to creating 100% Whole Grain Maple Oatmeal Bread and Quinoa Bread.  I have to say that I was quite excited when I saw that the next bread we needed to make was a sweet bread.  I love crusty type, hearth breads, but I was definitely in the mood for some sweetness.  I had been frustrated with previous recipes' substantially "wet" dough so I don't know why I wasn't more careful here.  I guess my brain was slightly turned off in my zeal to quickly make some sweet bread.  I dumped all the ingredients into my bucket, or rather my KA mixer, and after a few minutes of mixing I realized that I should have held back water.  My dough mixture was more like batter than dough, but I put it into the fridge after it had risen sufficiently and thought that maybe the flour would absorb some of that water and it would be less runny.  I was wrong.  The dough was difficult to work with.  I used flour, flour and more flour, but no matter how much I used the dough stuck quite readily to everything.  I couldn't shape it very well at all and just barely managed to fling it into the loaf pan after dough droppings fell on the floor and all over the front of me.  I was not happy :(  Oh well, this is a learning experience.  After about thirty minutes of baking, I think, I detected an overdone smell, looked in the window and the loaf looked much too brown.  Like many of the King Arthur loaf recipes that I make, I think this loaf needs to be tented with aluminum foil after the first 20 minutes of baking.  I quickly slapped a foil tent over my loaf, but it had already gotten a little too brown around the edges as you can see from my picture.
The loaf tasted good though, and I probably cut into it sooner than I should have, to have a slice slathered with homemade strawberry jam.  I plan on trying the loaf again when I have time and definitely leaving out much water.  I still have to say though, that my favorite maple flavored oatmeal bread is the "Vermont Oatmeal Maple-Honey Bread" recipe in The King Arthur Flour Baker's Companion cookbook.

I was quite perplexed with the Quinoa Bread.  I really thought it odd that the recipe said to use uncooked quinoa.  Quinoa is a grain that's native to South America and is very high in protein.  When it is cooked, it becomes translucent and is soft and nutty tasting, but using it uncooked in a bread, I guessed it would be hard and crunchy.  I had just made a loaf a few weeks previous using 7 grain cereal, and I did not like it because of the crunchy bite of the various grains.  I was so wanting to cook that quinoa before adding it to the flour, yeast, and salt, but I decided not to since the recipe as written said uncooked.  I did, however, add two extra ingredients to the recipe.  I've been reading Peter Reinhart's book "Artisan Breads Every Day" and I was comparing the Quinoa Bread recipe to his recipe for 100% Whole Wheat Hearth Bread.  I decided to incorporate the brown sugar and oil from his hearth bread recipe into our quinoa bread recipe to ensure that the bread had good flavor.  I put 1 Tbsp brown sugar and 1 Tbsp canola oil into my half recipe of Quinoa Bread.  For this recipe I was determined to have the proper consistency dough, so I weighed all my ingredients on my Salter scale and I only added 1 cup of water to the other ingredients to start with.  It turned out that for a half recipe of the Quinoa bread I left out 3/8 cups of the water called for. 

I decided to shape mine into baguettes like several others in the group.  I'm fascinated by this shape and that I can actually do it myself at home.  The only other baguette I'd made was with the Rosemary Flax bread from the HBin5 book.  Here is my first baguette:
The dough was wonderfully easy to work with, and I got a very good rise from the dough after shaping the baguette and leaving it to rest on the parchment before going into the oven.
I sliced the baguette and we topped the slices with some homemade pesto, ricotta cheese and garlic the first night and with just pesto the next night. 

I have to say it was quite good, even though ever so slightly crunchy from the little seeds.  I encourage you to visit the blogs of others in the group by going to Big Black Dogs, to see their wonderful creations!! 

Tuesday, September 7, 2010

Zucchini & Msemmen Flatbreads (18th Bread Braid)

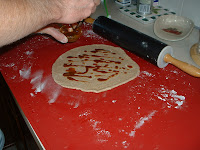
Well, this will be my first post to this blog or any blog for that matter.  This week my adventure took me to the 18th Bread Braid of the HBin5 Bread Baking group.  For this braid the challenge was to make a Zucchini Flatbread and an Algerian Flatbread called Msemmen, using the recipe for 100% Whole Wheat Bread, Plain and Simple from page 79 of the book.  Since I made the Msemmen first I will start there.  As discovered by others in the group, the amount of olive oil to use in combination with the spices was a little excessive.  I cut the spice amounts in half and added ~ 1 Tbsp EVOO to them.  Then I drizzled (sparingly) the oil mixture onto the rolled out dough round.   I found that if you drizzle even just a little
too much,  when you go to roll the dough up into the log, the oil
mixture piles up or pools at the end and starts to leak out onto whatever
surface you're working on.  I rolled my 5 oz dough balls out into ~ 7 in. circles.  There's no way you'd get it rolled out to 12 in. as suggested in the book.  My rolled up coil did not want to stay coiled, but I just left it alone until I rolled it out flat to 1/8 inch thickness. 


I only put ~ 1 Tbsp olive oil in my
skillet to cook my Msemmen in.  I didn't see the need for any more than that.  My Msemmen cooked up really well in the skillet.  The Msemmen I made the first day was not nearly as browned, but the Msemmen I made for my husband and I was nicely browned as my husband encouraged me to cook the full 5 min. on the second side.   The nicely browned Msemmen had a better texture and had some crunch to it.  I made some
Lemon Garlic Hummus  to spread on the Msemmen.  The Morrocan version of Msemmen is served with honey, but since we had made the spicier Algerian version,  hummus seemed an appropriate spread for it.     I also considered serving a chutney with it, as someone else I read about online had done when he made Msemmen.  He had used an apple cranberry chutney, but since the jars were $5 something at the store, I reconsidered and made the hummus since I had all the ingredients.  Here is my sous chef waiting on his dinner, which is late at this point, and our finished Msemmen.


Now on to the Zucchini Flatbread.  Since I had made the Msemmen twice using two 5 oz pieces of dough, I only had ~ 20 oz. of dough left.  When my husband asked "What kind of sauce?" and "NO Meat?" after I told him we were having zucchini flatbread for dinner, I knew I had better make two 'pizza's'.  So we made two flatbreads, each using ~10 oz of the dough.  Since we were on an adventure and Guff had grilled his flatbread, I decided we'd try grilling one of the pizza's.  (We'd never grilled pizza before)
Dean grilled the pepperoni pizza outside, while I made the zucchini flatbread in the oven.

I only used ~3/4 of a medium zucchini which I don't think was enough, but I wanted the rest of the zucchini for kabobs the next night.  I also added a clove of minced garlic to the skillet and some crushed red pepper flakes.  Here's the topped "pizza" before it goes into the oven:


  I thought Guff had a good idea using corn, so I thawed some frozen corn to put on mine.  Oh, and I also brushed the crust edges with some EVOO for browning.  Here's the pizza my husband did outside on the grill.  Success!!!!! We were very proud of ourselves for not flipping the pizza on the ground or burning it to black chardom.

The pizza's were ready to be eaten :)  We were sooooo hungry!


Dean was very good 
and ate 3 pieces of zucchini
flatbread, so I gave him my
share of the pepperoni
pizza that was left.  The
sous chef got crust scraps.
Tucker was very happy
with his share of our
adventure!!

If you want to see the beautiful creations of others who baked the Zucchini Flatbread and Msemmen, then I encourage you to visit Big Black Dogs and take a look!!