Showing posts with label baking with Julia. Show all posts

Tuesday, May 1, 2012

Hungarian Shortbread: BWJ

I was quite bummed that I missed making the Lemon Loaf Cake two weeks ago, but I was up for the Hungarian Shortbread this week, (having a little help from Mom).

I don't make shortbread around here very often.  The Apricot Almond Shortbread Squares I make are quite scrumptious, but I know they're not particularly good for the waistline, not that I have very much trouble in that department, but with hubby it's a different story.  So I try to keep shortbread making to a minimum.

The recipe for the Hungarian Shortbread that we made for Baking With Julia this week can be found on page 327 of the book. The book is definitely accurate when it says nothing gets much simpler than making these Hungarian Shortbread bars.  I think it is brilliant that the dough is stuck in the freezer for 30 minutes and then grated on the largest holes of a box grater to get the top and bottom layers for the shortbread.  No fussing w/ sticky dough here,  ...... although you do have to get the dough out of the mixer bowl, divide it into two equal parts and get it wrapped up in plastic to put into the freezer.

I decided to cut the recipe in half since I wasn't going anywhere that required bringing a dessert and I really didn't want to freeze a whole 9X12 pan of shortbread.  I made my shortbread in a 9X9 pan, and when it was done hubby and I took half and the other half of the shortbread went home with my mom and dad.
My mom is a little shy and didn't want her picture taken, but I did get a little bit of her hands in the picture grating the dough for me on my OXO box grater, while I readied the pan.  My piece of parchment was a bit crooked and didn't fit perfectly, but it worked out OK for our purposes.  My mom grated the first ball of dough from the freezer, we spread the dough out into the pan, and pressed it down gently into the corners and all around.  I baked the first layer of the shortbread at 350° for 10 minutes. (This was a slight deviation from the recipe.  In the book you are to bake both layers of the shortbread at the same time)  Out of the oven it came, and next, I spread about 3/4 cup of Blueberry-Peach Jam over top of our first shortbread layer.
I really wanted to make the rhubarb jam described in the recipe, but when I checked at Whole Foods they didn't have any fresh rhubarb and didn't have any idea when they might get some.  I'll have to save that for another time.  After spreading the jam around over the partially baked bottom layer, mom and I spread around the rest of the grated dough over top of the jam and gently patted this down just like the first layer.  Then into the oven it went for the final baking.  I believe it stayed in the oven for the full 30 minutes this second time and it was perfectly browned when it came out.
Mmmmm, it smelled good and we were pleased w/ our work!  Dad, Mom and I all had to sample a piece right away just to make sure it was good enough for hubby to eat when he got home from work.  (It was cooled first in the pan for ~ 45 minutes and then in the fridge for ~ 15 minutes.)

It was deeeee-licious!!!  How could it not be though, with all that butter in it  :) It was firm all the way thru, but I wouldn't say it was crunchy, just nice and firm.  I did dust it w/ confectioners sugar, but I didn't dump as much on as they indicated in the book.  I thought the shortbread was sweet enough without too much extra added sugar.

Later that same afternoon I sat down to relax and enjoy just one more piece with a nice, hot cup of my favorite apple-banana tea.
Moms and Dads are so wonderful to have around.  I'm so grateful that my parents could visit, help me to make this recipe and they also brought us lots of food and helped w/ some of the housework that I've not been able to do.  Thank you so much!!!!!!

The hosts for this weeks recipe were Lynette of 1 Small Kitchen and Cher of The Not So Exciting Adventures of a Dabbler ,so if you're interested in making this recipe you will find it this week at either one of these blogs.  I encourage you to visit them, to see how their Hungarian Shortbread turned out in any case.  Thank you so much for hosting this week Lynette and Cher!

Also, you can go here, to check out other Hungarian Shorbread posts.

Tuesday, April 3, 2012

Pizza Rustica: BWJ

When I saw the recipes chosen for April by the Baking with Julia (formerly Tuesdays with Dorie) group, I was thrilled at first at the word 'Pizza', but after looking at the recipe, I wasn't so excited about this one.  So, since I'm determined to try the majority of the recipes from the book, Baking with Julia, I decided not to skip this one, but modify it to make it at least tempting.

The recipe for the Pizza Rustica is on page 430 of the Baking with Julia book, or you can also find the recipe at the blogs of Emily of Capital Region Dining or Raelynn of The Place They Call Home today.  Emily and Raelynn have volunteered (Thank you!!) to be hosts for this weeks pick, and they will post they're experience w/ this recipe along w/ pics and the recipe itself.  I'm sure the posts this week will be interesting to read, since I think alot of people will have put their own twist on this recipe.

I had just received my copy of the current issue of Cooking Light magazine and was perusing its pages, when I surprisingly enough found a recipe for Pizza Rustica on page 162.  The recipe for the filling in the Baking with Julia book seemed like it would be kinda bland, so I was curious to see what all Cooking Light's recipe called for.  I noticed they used part-skim ricotta, lotsa veggies and 2 large eggs plus 1 white, so these are the components that I borrowed to use in my own modified filling recipe.

First of all, I had to make up the dough though.  Several people who had already made the dough said it was a little too sweet and the 1/3 cup sugar called for in the dough recipe did seem like quite alot, so I knew I was going to reduce the sugar some.

However...as I was standing there taking a mental inventory of all I had thrown in my mixing bowl ... flour (check), salt (check), baking powder (check) I completely forgot about the sugar.  OOPS :)  These things happen.  So by the time I realized I had forgotten the sugar, my dough was wrapped up and ready for the fridge.


Not knowing what else to do,  I sprinkled ~ 2 tsp of sugar on my pastry mat, unwrapped the dough, rolled it in the sugar until it all stuck, then kneaded the sugar into the dough.  Problem solved (sort of).

I have an old, very small food processor, so my dough was made using my trusty Pampered Chef pastry blender.  If they still make it like this, I highly recommend their pastry blender.  It is very sturdy and there are no wobbly, flimsy metal parts to it.

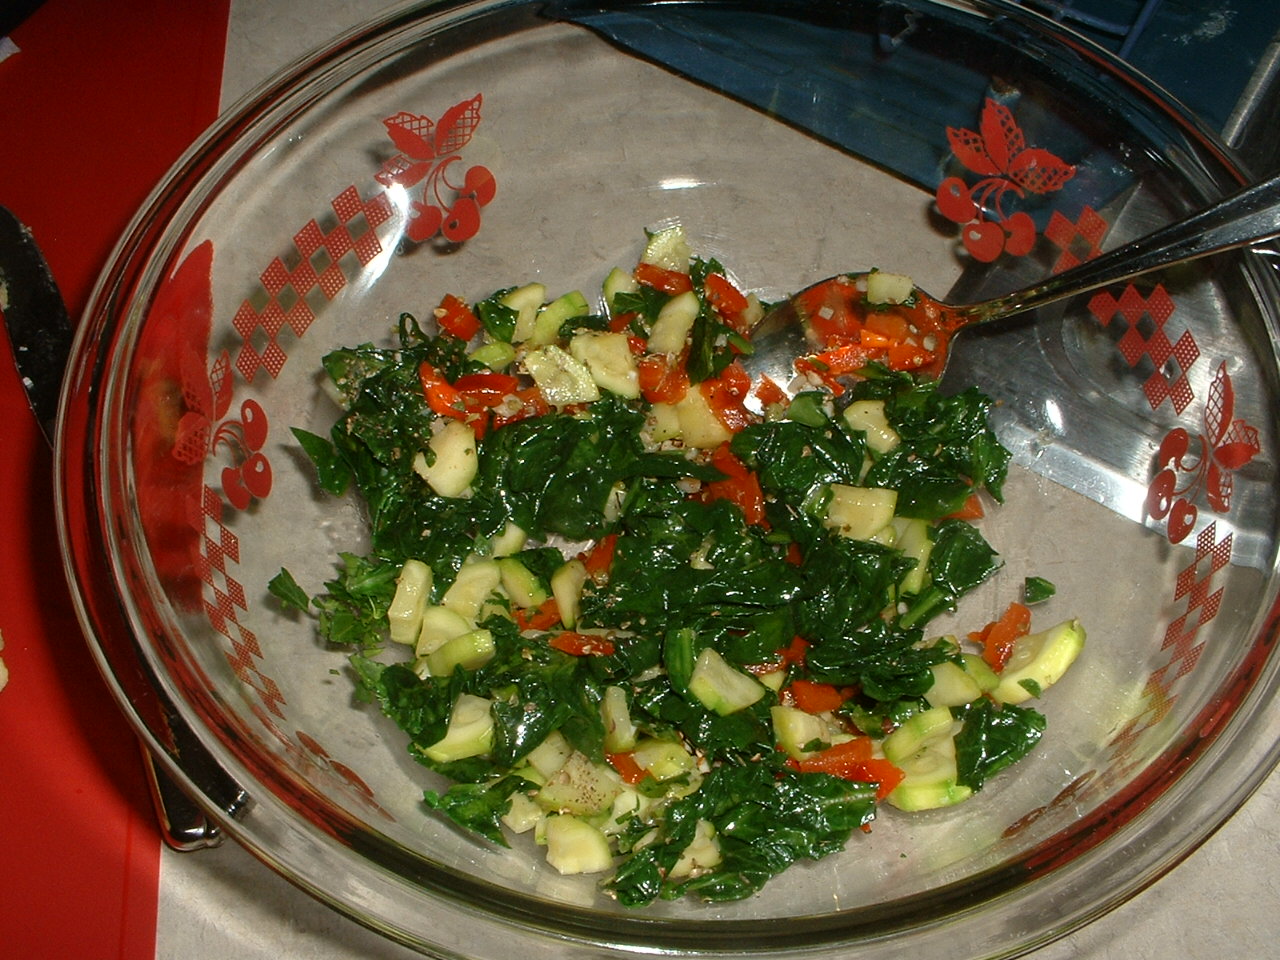
Here is the mostly complete cast of characters that went into the filling of my Pizza Rustica,
1/4 lb of thinly sliced deli ham, shredded (couldn't leave the meat out or hubby would be very sad)
1 half of a roasted red pepper (lower left hand corner)
3 diced green onions
1 small zucchini, diced
1 large clove of garlic, minced
~3 oz of baby spinach
~ 2 tsp minced fresh parsley
1 tsp dried oregano
2 oz of crumbled feta cheese
~3/4 cup of finely grated Parmesan cheese
12 oz of part-skim ricotta (I drained this for about 2 hours and got ~ 1 Tbsp of liquid out of it)
2 large eggs, lightly beaten
1 large egg white
1/4 tsp of fresh ground pepper
a pinch of kosher salt (since I didn't use the saltier prosciutto called for in the book)

Here are all my pretty veggies in my mixing bowl before I added the other filling ingredients,
Looks spring-ey doesn't it?

I sauteed my spinach and zucchini in a skillet in some EVOO, just til the spinach wilted and the zucchini softened a bit.  I then put these into a small colander so that some of the liquid might drain off.  Then I threw my diced green onion and minced garlic into the skillet to briefly saute them in the remaining oil.  All the veggies then went together into the above mixing bowl.  It was fun throwing the filling together.  It was easy to stir and once together it just got dumped into my pie plate already lined w/ the bottom crust.  

I rolled my dough between wax paper this time, because I've seen alot of others do it that way.  With this dough though, I should've sprinkled the dough w/ a touch of flour first, because the wax paper stuck pretty bad to the dough.
(No, that's not a bug stuck between the paper and my dough.  It's a stray piece of minced parsley that was stuck to my finger or something and got in there by accident :)  )

I had been wanting a pastry wheel for awhile now, so this was my excuse to go get one.  In the afternoon, before I started my pie, I dashed off to a Williams Sonoma store near my house, and picked my up a shiny new fluted pastry wheel and it's from Italy!

Here's my pie ready for the oven,
I almost dumped it going into the oven.  I baked the pie on a round baking sheet, just because it's easier to take in and out of the oven, but as you probably have experienced too, the stupid pie plate slides around on the pan like it were an ice skating rink or something. 

I almost forgot.  I added one last ingredient to perfect my pie.  Before I placed my lattice strips of dough on top, I had hubby spread on a thin layer of shredded mozzarella cheese.  My thinking is that it would melt and sort of create a barrier for excess juices coming up out of the pie.

Oooh,  it smelled wonderful while baking!  I was very nervous about how it would taste, since I don't usually modify recipes so heavily.  It turned out to be quite a delicious pie!  We let ours cool exactly 15 minutes, before cutting into it, which I think was perfect, because any longer cooling and it would've been lukewarm.  Even hubby said it was 'really good', which I usually don't get from him when I've made something that I've put both spinach and zucchini into.
Yum! Nicely browned mozzarella cheese.

Please go check out what some of the others in the group did for this episode of Baking with Julia here, and maybe you'll get some more ideas for how you'd like to create your own Pizza Rustica pie!


Stay tuned for Lemon Loaf cake in two weeks time.


Tuesday, March 20, 2012

Irish Soda Bread: BWJ

Usually St. Patrick's Day comes and goes at our house and we take no notice of it.  I don't prepare corned beef and cabbage at our house, nor do we consume any green beer on that day.  We might have a leprechaun or two running around here, though, who knows.  However, I've always been curious what Irish Soda Bread tasted like, since I'd never had any before.  I always say I'm going to make some each year when St. Patrick's Day rolls around, but somehow shamrock sugar cookies iced bright green with sprinkles, always push their way to the forefront of my mind and end up being made while the soda bread gets forgotten yet again.

This year was different though.  No shamrock sugar cookies emerged, but a big, plump, currant and raisin studded loaf of Irish Soda Bread came out of my kitchen last night.  Irish Soda Bread was chosen by the Baking with Julia group as the second recipe to complete for March.  Many thanks go to our hosts for this recipe, who are: Carla of Chocolate Moosey and Cathleen of My Culinary Mission.  I've peeked at their blog posts already, and they made some super looking soda bread, so be sure and go check out their posts as well!

I've seen many, many recipes for Irish Soda Bread around, and the most common variation or component I see to them all is the addition of some sort of dried fruit, usually, raisins or currants, so that's what I added to mine.  I had some pretty dried up currants that needed using and since there wasn't quite enough for a half cup, I also added some raisins.  The recipe stated that you could add 1 cup of currants or raisins, but I thought a half cup seemed like plenty.  I warmed up a small bowl of orange juice in my microwave and dumped in my currants & raisins, to plump up for 15 minutes, while I mixed up the rest of the ingredients for the dough.  The recipe is quite simple, its just flour, baking soda, salt, and buttermilk.  A lot of the recipes I've seen include at least some amount of whole wheat flour, so I subbed 2 cups of King Arthur's White Whole Wheat Flour, for 2 cups of the all-purpose flour.

After stirring vigorously to bring all the dough ingredients together, I dumped in my plumped up dried fruit (drained of the OJ), and worked them into the dough in the bowl with my hands (it was kinda messy),
My dough was quite wet when I went to dump it onto my lightly floured mat, so I think next time, I'll hold back on some of the buttermilk.  I ended up using quite a bit of extra flour to get my dough kneaded.  Actually, I don't know if you could call what I did 'kneading'.  The dough was so wet I couldn't handle it, so I just used my dough scraper to fold it over onto itself numerous times, before I clumsily transferred the whole wet mass to my parchment paper lined, baking sheet.

I floured my hands and tried to shape it into a decent looking rounded disk, but the dough kept sticking to my fingers.  Aaaargh!!  I tried wetting my knife to slice my 'X' into the top, center of the dough, but it still stuck and pulled at the dough, so my 'X' was pretty sloppy looking.  Oh, well.

Here's the finished loaf out of the oven,  Aaaaah, I wish you could've smelled it, but then if you baked your own you know what it smelled like.  I kept smelling butter as it baked, but I think it was just that 'bread baking smell' that usually fills the house, that I have missed the past several weeks, since I've not been able to bake much.
It was sliced while still warm, as there was no way I was waiting until it was completely cool to dig in,
Hubby had butter on most of his slices, but as it was suggested that Irish Soda Bread goes well with spreads and tea,  I sat down for a breather after cleaning up half of the dishes, and enjoyed a large slice smeared generously with my leftover Prune Lekvar (sweet prune butter) that we made for our Rugelach recipe from February.  The lekvar was PERFECT on this bread!!!

This bread will definitely make an appearance again next year at our house at this same time, and I think I'll even have to dig up a recipe for a nice Irish stew to go with it:)
If you like what you see and you'd like to try this recipe for yourself, you can find the recipe at Cathleen's blog or Carla's blog today or if you'd like to own a copy of the Baking With Julia cookbook for your own, then perhaps go here.  Also, you can check out the posts of a whole host of bakers out there, who turned out some spectacular loaves as well this past week.

Tuesday, March 6, 2012

Rugelach: Baking With Julia

The first pick of March for the Baking with Julia group turned out to be Rugelach.  I had made Rugelach before, just once, and loved them, so I was excited to try this recipe.  Traditional rugelach are made in the shape of a crescent with the filling being rolled up in little triangles of dough.  This is how I made them before, and it would've been easier to just deviate from the recipe and form the rugelach the traditional way, but then I wouldn't be trying something new, so my husband and I rolled our Rugelach jelly roll fashion as the recipe instructed.

Our hosts for this recipe are Margaret of The Urban Hiker and Jessica of My Baking Heart.  If you'd like to try making these Rugelach yourself, you can find the recipe on their blog post today, and you can also see how their Rugelach turned out as well!

The first component of the filling for these Rugelach was Lekvar.  I know, what a strange, kind of gross sounding word for something that supposedly tastes good.  An easier short-cut would've been to just use jam or something in the recipe, but I wanted to know what lekvar tasted like.  My husband and I chose to make the prune lekvar, since he is not too fond of apricots.  I made our lekvar up several days ahead of when we made the cookies.
It doesn't look appetizing, but it didn't taste bad.  The dried plums by themselves are rather bland and of course very chewy, but the lekvar was pleasantly sweet from the sugar that was added in making it.  The lekvar is just prunes, a smidgen of lemon juice, sugar and some finely chopped walnuts.

The actual rugelach cookies were a joint project that both hubby and I participated in.  I thought it was so sweet of him to offer to help me.  He is the best hubby in the whole wide world in my opinion!

First off we had to make our cream cheese pastry for the rugelach.  This was just cream cheese, butter, salt, sugar and flour mixed together in our stand mixer.  This finished, the dough went into the refridgerator for several hours.  While the dough was chilling we got together the rest of our filling 'stuff'.
For the nuts, I let him choose, and he wanted just hazelnuts and almonds.  Here's my trusty partner peeling the skins off the toasted hazelnuts:
Now we were ready for assembly.  The dried fruit we chose to use was blueberries, cranberries and a few currants.  The bowl in the far right corner is our cinnamon/brown sugar/sugar mixture.
First layer going onto our pastry dough is the prune lekvar,
then the cinnamon/sugar mix, next the dried fruit and lastly the chopped toasted nuts.
Now comes the tricky part,
...rolling the whole thing up jelly-roll fashion starting with the long side.  Did we do this right?  It seemed that a five inch width did not provide enough dough to roll up into a log and we had terrible trouble pinching the whole thing shut.  We didn't put on all the nuts and fruit called for, because we could see it was going to be difficult to roll.  All the topping tends to dam up at the end where you're trying to roll to.  I think next time we agreed that we would probably make a much wider and shorter rectangular piece of dough to spread our filing out on so that we'd get more 'spiral' effect to our cookies:)
After spending the evening in the refrigerator our log was nice and firm and we were able to egg wash it, slice it, and roll it around in our cinnamon/sugar/chopped nuts mixture.  Hubby did a thorough job of covering ours in the sugar mixture so that we'd have nice caramelization.
Oh, they smelled so good while they baked.  We made them first thing in the morning, so they were reminescent of cinnamon rolls in the oven.  The sugar made a beautiful little pool of golden goodness under each of the rugelach.  Normally I would break off crusty appendages like this, thinking they were unsightly, but not this time.  These were awesome little cookies.  We sampled them while still warm and gooey inside.  

The pastry part was light with a slight crunch and the whole thing did kind of resemble the flavors of a cinnamon bun, especially when eaten warm.  The filling was full of nice contrast, with the creamy lekvar, the crunchy nuts, chewy fruit all surrounded by a cinnamon-ey sweetness.  Very satisfying!

We still have more dough in the freezer so we'll be experimenting next weekend with modifying our rectangular shape for easier rolling, but other than that issue, we thought these were easy to make and a delight to eat as a husband and wife team.

Do check out how the Rugelach turned out for others in the group by going here.


Tuesday, February 21, 2012

Chocolate Truffle Tartlets: Baking with Julia

The second recipe chosen for February for the Baking with Julia group definitely had me a little more excited than the white bread recipe that we tried a couple of weeks ago.  I had the 4 1/2 inch fluted tart pans required for the recipe, and since I needed something rich and chocolatey to serve my special someone on Valentine's Day, this was perfect.  

It wasn't hard to decide whether to use store-bought or homemade biscotti for this recipe.  The biscotti is what gets mixed with chunks of two different kinds of chocolate plus a third kind that is melted with butter, to make the filling.  I love to make biscotti and I was long overdue for making some.  I had printed out a recipe quite a while back, and it had been sitting on my counter for months begging to be made.  The recipe is for Coffee-Hazelnut Biscotti, a recipe created by Dorie Greenspan which I found here.  

I was a little worried whether these biscotti would work OK in the tartlets, because they were a bit crunchy.  I had used Hodgson Mill Stone-Ground cornmeal in the biscotti, and it is a little coarser than good 'ole Quaker Corn Meal that comes in the blue & yellow cardboard tube.  The biscotti were perfect w/ my coffee in the mornings though, and I was so happy to have a small stash of biscotti again.  Hubby thought they were a bit too nutty tasting, so he didn't bother them much (he's not a coffee drinker, but is known to steal my biscotti to nibble on if they're to his liking).
I made up my biscotti on Friday and then made the tartlets on the following Monday.  I was a little nervous about making the chocolate dough for these tartlets, so I was thrilled to see a link to a You Tube video, in our P & Q post, which showed the episode on PBS TV in which David Ogonowski, the contributing baker for this recipe, makes the tartlets for Julia Child.  I felt kind of bad that I had succumbed to my desire to see exactly how he did it, and therefore provide myself unfair advantage in making this recipe, but any guilty feelings I had quickly disappeared.  The video was very helpful, and it made me feel more at ease after having watched David make the tartlets.

I felt more confident after watching how easily David made his chocolate dough, but not so confident that I was going to combine my flour, cocoa powder, salt, etc. together in a pile on my counter and then plop the egg and water into a well made in the middle.  I opted to mix by hand, but I cheated and did it in a glass bowl:)  Richard Prince, the instructor for a pie class I took once, emphasized that the best kitchen tool we have is our hands, so I figured my hands would give the best results for the dough.
The dough was definitely crumbly and not very cohesive when I first finished mixing it, but I squished it together the best I could, preparing two packets of dough to be chilled, one for the fridge for 3 tartlets now, and one packet for the freezer, for 3 tartlets (a different kind) later.

The dough was rather sticky and delicate for rolling into little circles to fit into the tartlet pans, but I just mustered all the patience I could, and worked slowly and carefully.  I did have to do some patching, but it wasn't too bad.  I was just making sure that I didn't have any thin spots in my crusts in case the filling would leak through. 
   
The hardest part of the filling was all the cookie and chocolate chopping.  Cracking all the eggs and melting more chocolate with butter was also time consuming.  It makes my back ache just talking about it:)  I'm glad I was only making half of the recipe!  
I thought the swirling together of the beaten egg yolks and the melted chocolate mixture was so pretty.  I was mesmerized by it, and could've stood there quite a while watching it play together in the bowl.
These looked good enough to eat already!!  I almost didn't bake them, and wanted to just start eating the filling, with its chunks of chocolate and bits of coffee-hazelnut biscotti.    

They baked up in the oven for about 13 or 14 minutes.  I went just a bit longer than the time in the book, because they still looked wet on top, not dry.  

I wanted to make them special for Valentine's Day so I pulled out some as yet unused stencils I had picked up last year, and used confectioners' sugar to dust heart patterns on our tartlets.  
I added a sliced strawberry to the top of each one, since several people commented that it was rich and it needed something to break up the chocolate flavor.  I just can't do ice cream in the middle of winter when the average temperature is 40° outside, so I decided on fruit instead.  Raspberries or strawberries seemed a suitable substitute.  

I finished baking my tartlets off early in the afternoon and after they had completely cooled I covered them, and placed the pan in the fridge so they could firm up a bit if needed.  Then I let the tartlets come to room temperature while we ate dinner.  

We didn't speak much during dessert.   We just kept mumbling, 'Mmmmmm,  Mmmmm'.  The biscotti I made worked perfectly in these tartlets.  We couldn't even detect the crunchiness from the cornmeal.  The tartlet filling was firm, but really smooth and truffle like.  We were so stuffed after eating them, we thought we would explode.  They were very filling!  We split the third one for dessert the next night and it was just as good.

If you'd like to see how these tartlets turned out for others in the group, then click here.  If you'd like to make these tartlets for yourself, our hosts for this recipe are Steph of A Whisk and a Spoon, Spike of Spike Bakes, Jaime of Good Eats 'n Sweet Treats and Jessica of Cook Book Habit.  I believe they will all have the recipe included in their blog posts for February 21.  

Until March 6, when we get to make Rugelach!  


Tuesday, February 7, 2012

Baking With Julia: White Loaves


Well, its finally here, the first day of Baking With Julia!  I'm so excited to be starting with a group at the beginning of a book... and, its also not a book just about bread, which I'm happy about.  I love to bake bread and try new recipes, but there are also a lot of great baked treats out there, which I've never tried making before.  I'm kind of lazy in that if I don't HAVE to do it, I won't, so this group will help push me to try things I probably wouldn't have made otherwise.  

I love the new book, that the previously known as "Tuesdays With Dorie" group, is baking from now.  It's Baking With Julia, written by Dorie Greenspan and is based on the PBS Series which was hosted by Julia Child.  The show played host to several dozen well known chefs and so the book draws from a wide range of talent in the culinary world.  It's kind of nice to try so many different chefs' recipes, while only having to buy one book.

The first chapter of the book is Breads, which is where we find our first recipe for the group, which was fine with me, since that's what I'm most comfortable making right now.  The recipe for the White Bread, can be found on page 81 of the book or since this first recipe is being hosted by Laurie and Jules,  I believe the recipe can be found over on their blogs today.  They are the daring leaders of this group and I'm grateful for their willingness and dedication to keep the group going as it journeys into a new book.

I pretty much followed the recipe as its written, except that I substituted instant yeast for the active dry variety, which I don't seem to get along with very well.  I always keep a little plastic container of the instant kind in my freezer, which I pull out several times a week to make our sandwich bread, buns, pizza dough, etc.
I'm becoming so comfortable making bread, that alot of times I'm not really thinking about what I'm doing, or maybe just not thinking at all.  Extremely happy to be starting the first recipe the group is working on,  I was humming along to myself last week, as I was measuring my ingredients.  I was talking on the phone to my hubby, who called on his lunch hour, to make sure the house and myself hadn't blown away (big storm in the vicinity).  My mixer was whirring along and I told him I had to go, as the timer was about to go off.  I had mixed my dough for 10 minutes, as instructed in the recipe, BUT, I had used the paddle attachment.  YIKES!  I didn't know if this was a terribly big deal, but I lifted my ball of dough out of the bowl I'd just placed it in, chucked it back into the stand mixer bowl, attached the dough hook, turned the mixer on and set the timer for another 10 minutes.

I've included a couple process photos below showing the bread at different stages.  There is a picture for each step I followed under the 'Shaping the Dough' heading.  There are no pictures in the book for this part, but it was easy enough to tell what they wanted you to do.  Anyway, if you don't shape it exactly as they intended, it will still be a fine loaf.
The finished loaf of bread turned out really well, and the extra kneading, didn't seem to hurt the dough.  I proofed my dough in the oven with just the light on and that seemed to be enough warmth for the first rise and second rise that the dough went thru.

The taste of this white bread surprised us and was better than what we had expected.  It wasn't dry at all, and kept well on the counter in one of my bread storage bags that I picked up at King Arthur Flour at Christmas.  My husband couldn't quite think how to describe the bread, except that it was kind of like his favorite loaf of white bread, but kicked up a notch.  It didn't taste like supermarket white bread at all.   I've only made plain white bread a couple of times, but this recipe produced the best tasting loaf of the bunch and we used it to try out a recipe for tuna salad that I'd jotted down from an America's Test Kitchen magazine.

Stay tuned for more Baking With Julia, when I return in a few weeks with Chocolate Truffle Tarts!  Thank you Laurie and Jules for hosting this week!!