Friday, September 30, 2011

Whole-Rye & Whole-Wheat Bread (Mellow Bakers: September)

This Hamelman recipe, found on page 195 of his book, Bread, was the perfect opportunity to try out my new round banneton, which I got for my birthday in June.  I feel so bad that I hadn't tried it out yet, but time just flies and before I knew it, September's here.  My little 8 1/2" cane basket,
waited patiently for me though, nestled in its emerald green papasan chair in the living room. 

The recipe for this bread was interesting in that it contained 25% whole-rye flour, all of which was acidified in a sourdough prepared the night before, 25% whole-wheat flour, and a bit of commercial instant yeast.
According to Hamelman, the combination of the whole wheat along with the acidified rye is supposed to make a bread with good moisture retention and good keeping qualities.  The rye sourdough, the whole-wheat flour, high-gluten flour, water, salt and 1/2 tsp  instant yeast were mixed together on baking day to form the dough.  My dough seemed quite tacky in the mixer bowl, although I didn't think it needed more flour at that point.  However, when I went to take the dough from the mixer bowl and then later when shaping, it was fairly sticky and I had second thoughts. 

I floured my new banneton really well with rye flour since the dough was extra sticky.  It was so sticky that I had trouble forming my boule and then getting it off my fingers and into the basket for its final fermentation.  It kind of flopped off my hands into the basket and was sort of off center, but I didn't want to mess with it, because that's when I start making things worse.  I covered it with plastic wrap and a tea towel and left it for an hour and 15 min.  When I uncovered the basket the dough ball had poofed up nicely and filled out the basket.  Magic!

I placed a piece of parchment on my peel, placed the whole thing upside down on top of the basket and then flipped the whole thing over so that my basket was now upside down on my peel. 

Got that?  Keep your fingers crossed.

I lifted the basket and it didn't stick!  Woohoo!!

My scoring of the loaf even went well this time,

I baked the loaf on my stone until the internal temperature said ~ 204°.  I was surprised the loaf wasn't darker, but I took it out anyway. 

I didn't cut into it yesterday, but waited til today, so I could make a nice sandwich for my lunch with all the fixin's,
I don't know about peanut butter & jelly sandwiches, but it made me a wonderful turkey sandwich for lunch.  I got fancy today and added all the extras.  Normally my lunch sandwiches are peanut butter & jelly, and if I do lunch meat, it is only lunch meat and cheese, no veggies cause I'm kind of lazy when it comes to lunch.

Great bread!!  Has a slight tang, and interesting flavor from the combo of wheat flour and the rye component.  It's more dense than an all white flour bread, but I didn't think it was too dense at all.

Check out what other Mellow Bakers did this month here.

Wednesday, September 28, 2011

Nick Malgieri's Fig and Almond Bread


This will be the first bread I've baked along with the others in the facebook group, Artisan Bread Bakers.  Phyl, the organizer of this group, has chosen Nick Malgieri's Fig and Almond bread as the Bread of the Month for September.  I didn't see Phyl's orginal announcement of this bread for September, but saw it a little into September and started flipping through Nick's book, The Modern Baker thinking that must be where the recipe had come from.  Alas, it wasn't in any of his current books, and so I had another thought and popped on over to Nick Malgieri's blog and lo and behold, he has given his fans a sneak peak into a new, upcoming book of his. 

I was so thrilled that he chose to divulge one of the bread recipes to any who might want to try it.  I couldn't pass this Fig and Almond Bread recipe by and quickly picked up a  6 oz. bag of Sun Maid Calimyrna Figs at the store.  (If I already have part of the ingredients sitting out on my counter, then I'm more likely to complete the projects that I want to get done that month). 

I thought the recipe was easy to follow, although it would have been nice to have a few 'why' explanations for some of the steps, especially for novice bread bakers and inquiring minds. 

I followed the recipe pretty much as written.  I did use instant yeast instead of active dry and in that case, you can just add the instant yeast to the dry ingredients listed in step #3 and can just skip step #2.  The Sun Maid dried figs sealed in a bag are usually pretty moist so I didn't need to steep my figs in step #1. 

The ingredients are straightforward and were all in my pantry.  I used 15 grams of brown sugar instead of granulated sugar, since the sticky, sugary sweet figs just seemed to call out brown sugar to me instead of white.  I love, love, love figs and it was hard not to eat them as I cut them into a 1/2 inch dice.  As I was handling them, I felt as if I'd just reached into Pooh's honey stash and pulled out some treasure he'd stashed along with it.  I think Pooh would like figs don't you?

I used a single edged razor to score one of the boule's with an 'X' and I gave the other one an overlapping box cut.  The bread baked up wonderfully, but with not a whole lot of oven spring.  I brushed the loaves liberally with the melted butter after they came out of the oven and we ate half of one of the loaves with dinner.

I asked my husband, who is usually very generous, and not as stingy as myself, who we might share the other loaf with, and he replied that we should keep both for ourselves.  This bread was that good! 

Thank you Nick, for a wonderful recipe to add to our list of family favorites!!

Great pick Phyl!

Monday, September 19, 2011

Apple Strudel using NM's Instant Puff Pastry

This time around for the Modern Baker Challenge, I chose the Apricot & Almond Strudel recipe from the puff pastries section of Nick Malgieri's book, The Modern Baker.  I was a little nervous about this recipe as the instructions for making his instant puff pastry seemed too easy and I knew it couldn't be that simple.  The pictures all showed a clean work area and perfect looking dough.

Before I started making the instant puff pasty, I had decided I would take pictures at different stages, but as I started into it, I ran into problems from the beginning, so I felt lucky that I even got the puff pastry dough made at all.  My poor old Hamilton Beach food processor bowl only has a 3 cup capacity, so I knew I could only make at most a half batch of Malgieri's instant puff pastry, which was fine since this recipe only required a 1/2 batch.  The amount of butter and flour, though, for a half batch of puff pastry, was still a little much for my food processor bowl.  I had a lot of flour going everywhere and when I went to dump everything out onto my floured mat, I had quite a bit of loose stuff. 

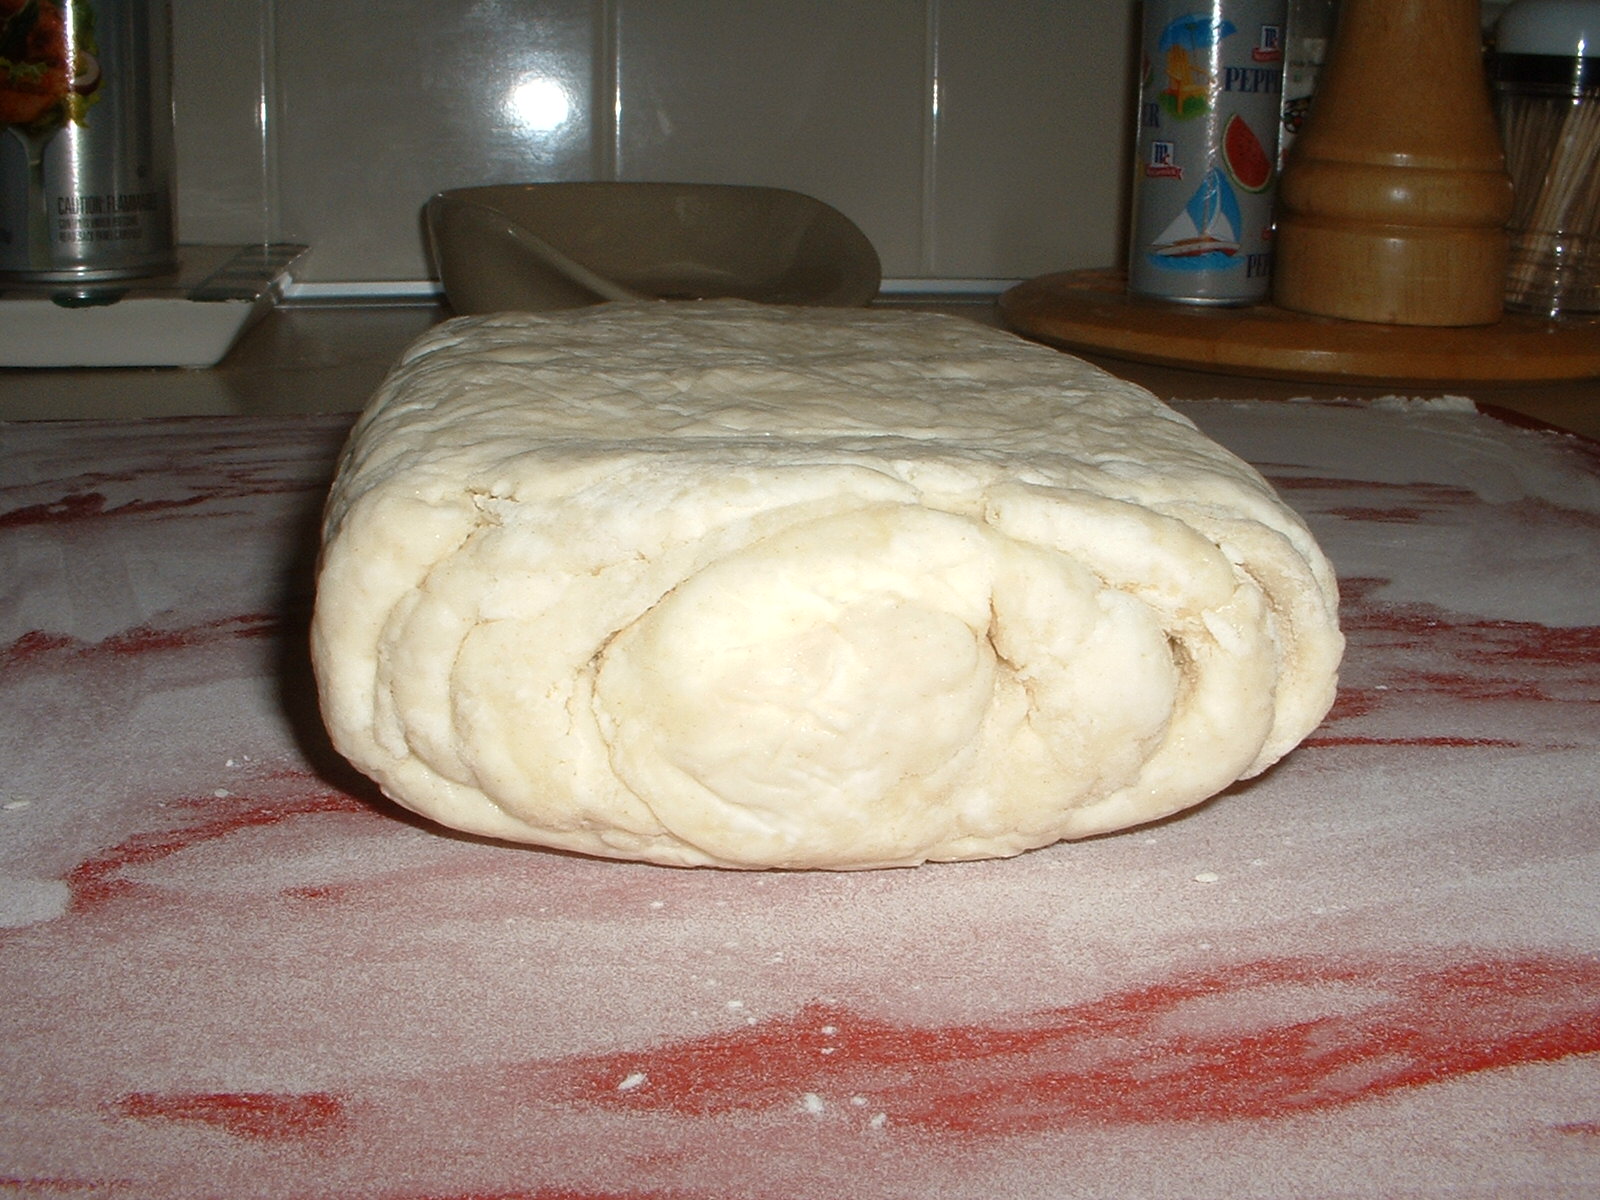
I managed to get the puff pastry made, with a minimal amount of grumbling, wrapped it tightly in plastic wrap and tucked it into the back of the fridge on the bottom shelf.  I was really worried if the stuff was going to roll out OK for the strudel, because it was very crumbly and I had a tough time rolling it up in the last step of making the puff pastry.  I was rolling with one hand and using my large off set spatula with the other, to get under the dough that was sticking to the mat.  It was definitely not a tight log.

Here's my puff pastry log before I started rolling out dough for the strudel,
I wish I could've rolled it tighter to get more layers into my puff pastry, but better luck next time I guess.

I asked hubby, apricots or apples for the filling, and I knew he would pick apples.  He's not a real big fan of apricots, and since fall is quickly approaching, it seemed more appropriate anyway to use an apple filling for the strudel.  Then as I kept looking at the recipe, I just couldn't see apples paring well with the almond part of the filling, which is made w/ almond paste.  I thought the almond paste mixture would overpower the apples and that the apple flavor wouldn't shine through. 

I'd just recently purchased a copy of America's Test Kitchen's third installment of Cooking for Two 2011, and what da ya know, there was a recipe for Quick Apple Strudel near the back.  They used phyllo dough for their strudel, but the filling sounded really good so I decided to double it for my strudel and away I went.

The ATK apple strudel filling consisted of:

1/4 cup golden raisins
1 tablespoon Calvados, applejack, or apple cider (I used cider)
2 tablespoons dried bread crumbs or panko (I used the latter)
1 tablespoon melted butter (for toasting the bread crumbs in a small skillet)
1 medium McIntosh apple, peeled, cored, sliced and diced into 1/4 inch pieces
2 tablespoons sugar
1/2 teaspoon fresh lemon juice
1/8 teaspoon ground cinnamon
Pinch of salt

I doubled this filling recipe and for the apple I used roughly two apples, which consisted of Golden Delicious, Cortland, and a McIntosh.  Whenever I make apple anything I use several different kinds of apples to get varying flavors and textures in the finished dish.

Here's the bottom layer of my strudel before and after laying on the filling,

The top layer of the strudel remained in the fridge while I docked the bottom layer and spread my filling out onto the dough leaving a 1/2 inch margin all around.  Then the top layer came out of the fridge and after cutting the slits in it and brushing egg wash on the edges of the bottom layer, the top was placed on, sealed, crimped, poked, prodded and everything else.  Here she is ready for the oven,
and at this point is where my tummy usually starts growling a little prematurely, since I know it'll still be a while before we can dig in!

Unfortunately, the strudel wouldn't fit on my rimmed half sheet pan, so I then had to bake it on my rimless air bake cookie sheet and butter went everywhere in the baking process.  Oh well, I rarely make oven messes so this little one shouldn't be too hard to clean up.

It was worth it and hubby declared that it was delicious.  I thought it was good, and very flaky tender, but it was just a tad bit greasy tasting to me, because of all the butter.  I know one thing, I probably won't be trying to make my own puff pastry again until I get a knew 12-cup food processor!

Yum!!!!!!!!

Thursday, September 15, 2011

Whole Wheat w/ Pecans & Golden Raisins (Mellow Bakers: September)

I had already decided that I wanted to make this bread into rolls.  Then, as usual, I reasoned that soup would be the best dish to serve my rolls with.  Next, I needed some cooler weather to go with the soup and rolls.  Last week (or was it the week before) there was a brief cold spell following behind Hurrican Irene, but it was gone before I got a chance to make the rolls.

Then, this week another cold front was supposed to be moving thru last evening.  The rain and cold came about 5 hours after dinner, but these rolls and the soup tasted delicious anyway.  I only made 1/3 of the recipe, since I didn't want a ton of leftover rolls, and was able to get 7 good size rolls out of this amount of dough.  It's amazing that these tasted so good, when the only ingredients were flour (whole wheat & bread), water, salt, yeast, raisins, and pecans. 

Since Hamelman said keep the toasting light, I toasted my pecan pieces at 350° for 2-3 minutes, just until they were shiny and started to smell nutty.  The raisins were soaked in warm water for 30 minutes before adding to the dough.  I dried the raisins off really, really good before adding them in.  I didn't even bother using the mixer to try and incorporate the raisins and pecan pieces into the dough.  Its just easier to stick my hands into the stand mixer bowl and knead them into the dough right in the bowl.  As I kneaded, I has happy to deposit the pecan pieces which kept popping out of the dough, into my mouth, since, as usual, my tummy was growling as I was working.

After a rather long fermentation of two hours, with a fold in between, I portioned the dough into 3 oz pieces, covered them for 10 minutes, then shaped them into round rolls.  They had a final fermentation of about 1 hour and baked for ~18 minutes on a parchment lined sheet pan.  I tried to score a couple of the rolls for fun and left the others alone.   There was already a steam pan on the bottom oven shelf from baking hoagie rolls a few hours earlier, so I went ahead and put some hot water into the steam pan right after I slid the rolls into the oven.
 
The soup I chose to go with the rolls was from Dara's Cookin' Canuck and it was delicious!!  It was Chicken, Corn & Potato Chowder and had just enough spice to warm you, but not any burning heat.  It had green chilies, lots of corn, cheese and a pinch of cayenne pepper in it and was topped w/ bacon, more cheese, and chopped green onion.

Hubby didn't come right out and say the rolls were delicious, probably because of the nuts, but when I asked him if he liked it, he heartily shook his head, as his mouth was full of hot, buttered whole wheat roll.  I think we both like most of the breads I make, just because they taste so much better than what you can buy at the store.
Here's a picture of just the hoagie rolls that I made earlier in the day.  It was my first go at making hoagie rolls and I was really happy with the way they turned out, despite the one roll that kind of resembles a bowling pin shape:)  The hoagie rolls are being turned into Greek Turkey Meatball Subs tonight.  Mmmmmm!!
Be sure and go see how the whole wheat w/ pecans and golden raisins bread turned out for the other mellow bakers this month!